Cross-sell Popup
20 STEPS
1 The first step is to open the theme settings area of your Shopify theme config and go into the Cross-sell Pop-up section.
2 Next, enable the cross-sell popup.

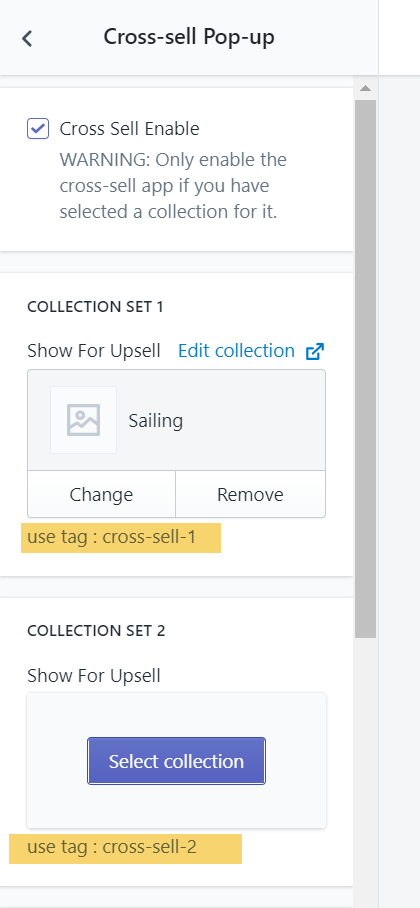
3 Next, choose a collection to display in your first cross-sell.

4 To display your first cross sell on any products, simply apply the tag 'cross-sell-1' to them.

5 Click Products

6 Locate the product that you would like to display the cross sell on.
Enter into the product configuration.

7 Scroll down and go to Tags section.

8 Apply the tag ('cross-sell-1') and than hit enter.

9 Click Save and go back into the theme config.
You can create up-to 8 cross sells to apply to any number of products in your catalog.

10 Now, scroll down and go to the Heading section.
Enter the cross sell popup heading text.
Ex. "You're Only XX Away From Unlocking Free Shipping"

11 Next, you have the option of displaying a shipping achieved message.
This message will show when your customer has qualified for free shipping.
Ex. "You Have Qualified For Free Shipping".

12 Select the color for the heading text.

13 Select the font size for your heading text.

14 Enter popup short description text.
Ex. 'Customers also bought...'
You can change the text message color with the "Heading color" setting just below the text input.

15 Select text font size.

16 Select your 'Continue shopping' button background color.
also, you can select it's text color from 'Continue shopping button text color' setting.

17 Select the view cart button background color.
From the "View cart button text color" setting, you can change it's text color.

18 Select the background color for the checkout button.
From the "checkout button text color" setting, you can change its text color.

19 Now, click on save to save theme config and preview your changes.

20 Cross sell popup.
That's it. You're done.

Here's an interactive tutorial for the visual learners
https://www.iorad.com/player/1596809/Demostore---Cross-sell-popup
The new Shoptimized Cross-sell Pop-up allows your customers to quickly add relevant products to their cart to increase your average order value.
To configure the cross-sell, you'll first need to create a collection or use a premade collection with products you would like to show in the cross-sell.
You can currently, select up to 8 different collections (so 8 cross-sells) - We can add more in if you need, just ask support :)
1. Select collection for cross-sell 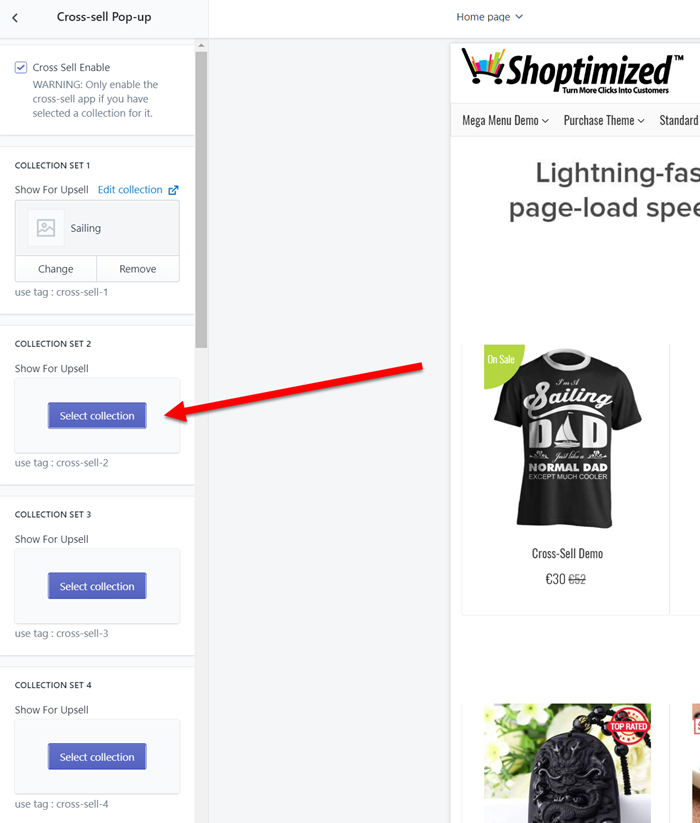
2. Apply the tag for the relevant cross-sell to any product or products you wish the cross-sell popup to display on.
3. Repeat the process for any other cross-sells you would like to create.
You can view a demo of our cross-sell feature in action here: https://shoptimizeddemo.myshopify.com/collections/showcase-1/products/cross-sell-demo
Tags for cross-sells:
- cross-sell-1
- cross-sell-2
- cross-sell-3
- cross-sell-4
- cross-sell-5
- cross-sell-6
- cross-sell-7
- cross-sell-8
The cross-sell also displays a free shipping threshold message or any other message you may wish to cross-sell.
Simply use the XX value to dynamically insert the free shipping threshold amount.